We have encountered customers in the financial services industry who want to archive their print jobs by date using our print server RPM Remote Print Manager® (RPM). One pattern we've run into is where they may receive a random number of text reports throughout the day. These reports will need to be appended into one file with the current date in the name. And, of course, the setup needs to work "hands-free," so there is no daily set of steps to get this result. It has to be automatic and fool-proof.
Using the RPM archive function
RPM has a variety of outputs that we refer to as "actions" including printing to a printer, archiving to disk, running a program or generating an email, to name a few.
Let's take a look at the setup for this operation.
- First, create a queue. In the user interface go to Queues / Create and enter a name. In this example, I used "date."
- Add an archive action. In this example, I selected an output folder, and I'm working on the setup for the filename template.
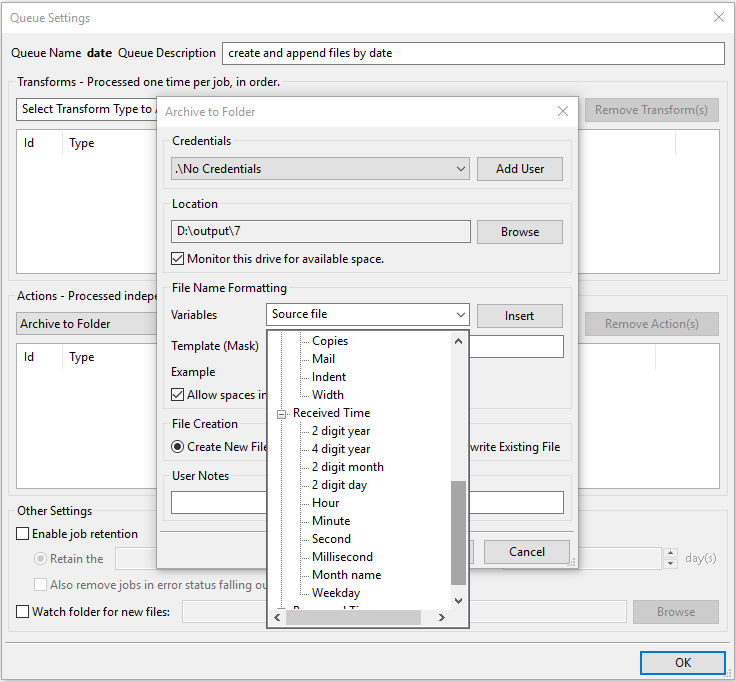
These steps will get you to the display shown above:
- Click the "Variables" list which is labeled "Source file"
- Scroll to the bottom
- Open the branch labeled "Received Time" by clicking the plus.
Now we are ready to build a filename template. RPM will use this template to create a filename each time it runs this archive action.
How to use the current date
The template is a text field. First, delete the current contents of that field.
Next, open the Variables list, scroll to the bottom, and select "4 digit year". Now that Y2K is no longer an issue you can use the two-digit year if you like, but I still prefer the four-digit year because it sorts predictably.
Click the "Insert" button.
Now repeat with '2 digit month", "Insert," and "2 digit day" followed by "Insert."
Your template field should now look like this: "<rY><r#><rD>"
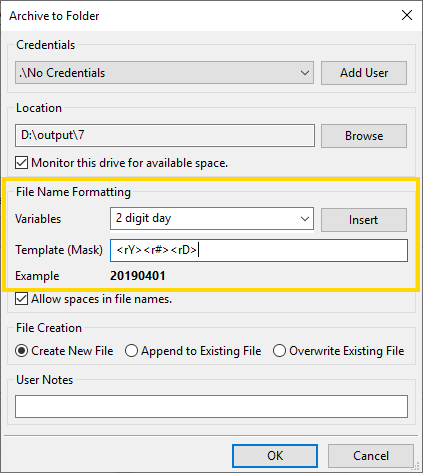
Note in the highlighted area that the template field shows the text above. Below that, the Example field shows "20190401" because that is how RPM would process that template using the current data. We're only using the date in this example.
How to customize the filename
You can customize the filename by just adding text to the template. Let's say for instance you wanted to separate the date fields with a dash and attach the file extension ".txt."
Let's start with our current example "<rY><r#><rD>" and add a dash between the angle bracket characters ">" and "<" being careful not to change the text between the angle brackets.
We should have this: "<rY>-<r#>-<rD>"
Now add the extension, and we have this: "<rY>-<r#>-<rD>.txt"
The example field updates as we change the template. Now it reads: "2019-04-01.txt"
One note of warning: you have to be careful about changing the tags. RPM will look for "<rY>" and change that to the 4-digit year. If you alter "<rY>" this will no longer work. The lesson is to look at the example field to verify you are doing what you mean.
How to append to an existing file
Take a look at the highlighted area in our form:
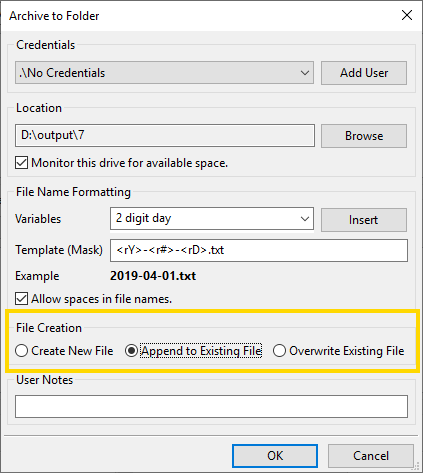
I've selected "Append to Existing File" as the "File Creation" option. However, you'll notice when you do this the user interface does not prompt you for a file name. The reason is that RPM calculates the filename using the folder in the Location field, and the filename using the job information plus the template.
- If that file exists, then RPM appends the new job data to that existing file
- If the file doesn't exist, then RPM creates it and writes the job data to it
Conclusion
Hopefully, the steps above make clear that RPM can nimbly calculate filename using data related to your print jobs, park them in any folder you choose, and append all day long. The fact that RPM does this without supervision makes it appealing for many uses.
If you have any questions or would like to see more topics like this, please leave a comment! Thank you.