License FAQ • Requirements • Trial restrictions • Extend trial • LiveTrial • How to license • Store the license • No more licenses • Supported • Renewed • New server • Username • Reset • New license • Module status • Deactivate • Migrate
The process of migrating applications and systems to a new server is a fact of life in the IT universe. Old hardware becomes outdated; old disks lack the capacity, virtualization, and more. Just a month before writing this, I migrated my development environment to a new system, so I understand the pain to an extent.
There are several areas where planning makes successful when it comes to moving RPM Remote Print Manager®) (RPM) to a new environment:
- Create the configuration directory on the new system
- Recreate the external dependencies
- Copy the configuration
- Run the RPM installer on the new system
- Migrate the license from the old server to the new
- Select your printers one more time
- Conclusion
Please note: the Software Upgrade & Maintenance (SUM) must be current. We will not activate your license on new hardware without it.
Create the configuration directory on the new system
We should create the configuration directory first. Later, we'll copy the database to this directory. If your RPM setup uses overlays (or watermarks), they will also go here.
On your system, you'll have a hidden "ProgramData" directory. On my old Windows 7 and my Windows 10 system, this is "C:\ProgramData".Open this folder in Explorer by entering the address bar: %allusersprofile%. If that doesn't work, contact your system administrator for assistance or try searching the Internet.
In your "programdata" folder, create a folder called "Brooks Internet Software." Then, create another folder named "RPM" We'll refer to this as our "configuration directory."
Here is a DOS directory listing of my configuration directory:
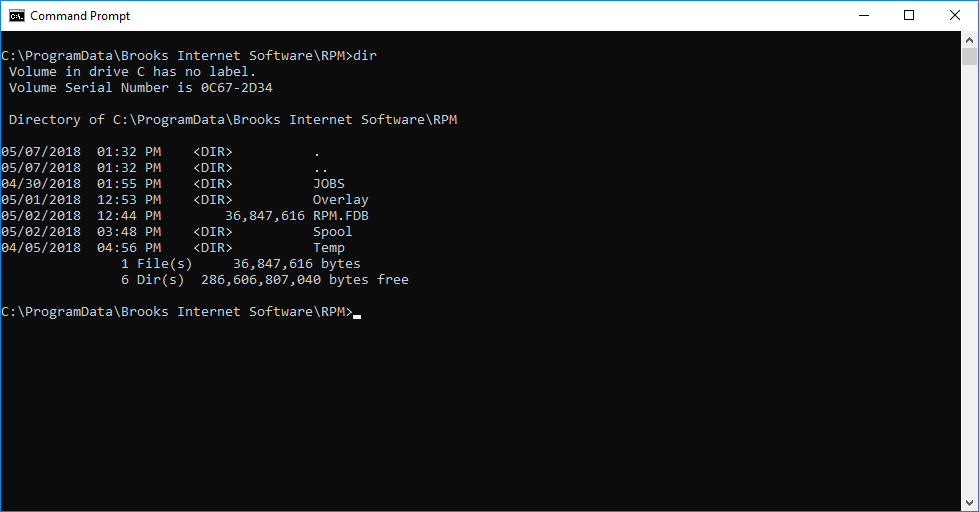
If your old system has an "Overlay" folder, then create it on the new system.
If you have job retention turned on in the old system and wish to preserve the completed jobs, you can copy the spool folder from the old system to the new one. The spool folder contains folders for individual queues, so you'll also be copying the job files. They should match up with the settings in the database.
Don't worry about the JOBS or the Temp folders. RPM will create them as needed.
Recreate the external dependencies
The external dependencies you need to create are:
- Windows printers RPM prints to
- folders it saves jobs to
- applications it runs external to RPM
- watermarks
- any files you insert or append
- any custom banner files
The first three items correspond to RPM devices. There is an easy way to list all the devices RPM is using. In this context, applications would also be considered devices by RPM.
- In the user interface, go to the View menu and select Devices
- Switch to the Devices tab
- Click the "Type" header to show all the devices ordered by type
Recreate the folders on the new system, and ensure your printers are installed and named the same as on the old server.
A note on applications; most of the executables I run from RPM are part of an install package, so you will most likely need to track down an installer rather than a single executable. Then, install them in the same folder as on the previous server or update the RPM settings to point to the program in the new location.
Note: We recently added a page about migrating filter actions to a new server.
You will find watermarks in the "configuration directory" folder. Copy the files from the overlay folder on the old machine to this one. Watermarks are an Elite-only feature. If you do not have a Watermarks folder on your old server or it's empty, you can safely skip this step.
If you insert or append files, or use a custom banner file, then use a transform. You can see the list of current transforms by going to View in the user interface and selecting "Transform Master List." Then open the Transform Master List tab. Next, click the Type column header to arrange the transforms by type. Finally, you can get to the form for each transform by double-clicking. This way, you should be able to track down each file you use.
Copy the RPM configuration
We store the RPM configuration in our database. By default, the file is called RPM.fdb, and it is in the configuration directory on the old server. If you moved or renamed it, find it in the new location. Then, copy it to the default configuration directory on the new server.
Once you copy the database to the new server, please follow these necessary steps:
- Stop the RPM service
- Make sure the user interface is not running. If you don't see it on your screen or in the taskbar, please use Task Manager to ensure it's not running.
- When you have the database in place, run the installer to update RPM.
Please note that the installer will run a program that migrates your old database to a new database. We provide an empty database for this purpose. The database migration program includes all the programmatic changes we've made to the RPM database since your old version in the new one. Please note: it can be very troublesome if you don't do this.
Run the RPM installer on the new system.
You'll want to get the installer that matches your current RPM license. The issues here are:
- RPM Elite or RPM Select
- which architecture (Win32 or x64).
Since many people take this opportunity to upgrade to the latest version, we assume you may want to get the highest version available to you at this time, and we encourage you to do so. Today, most Windows workstations and servers are running the x64 version of RPM, which is our recommended architecture.
The fastest way to identify whether you are using RPM Elite or RPM Select is to open the user interface. The title bar will say either "Elite" or "Select." On my system, it reads:
RPM Remote Print Manager(R) Elite 6.1.0.475 x64 at localhost - Admin - Brooks Internet SoftwareIf your product license is Select, the title bar will have "Select" after the product name rather than "Elite."
Migrate the license from the old server to the new
The first thing you will need to do is deactivate the license on your old system. To do this, go to the user interface, and select Help -> License.
The License Status window:
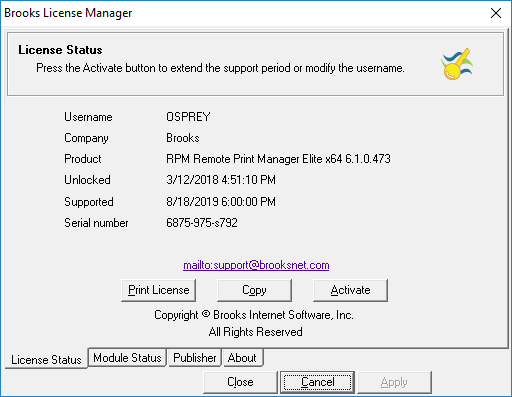
Note the serial number shown here. You should send your serial number (not this one) via email to support@brooksnet.com with a request to deactivate this license. When you deactivate a license, the technician will direct you to uninstall the old software. If you would like to test the new installation, please take advantage of the 21-day trial inherent for installing and migrating your license later. The trial will allow you to have two working installs simultaneously, which our EULA usually restricts.
When it's time to activate the license on the new machine, you can use the Internet activation method or contact us. If you do contact us, we will need the following information:
- order number (our sales receipt or invoice number) from the original order for this license
- the auth code we issued you via email at the time of purchase
- the serial number on the new machine; you would look this up the same way we did for your old device, as shown above
Select your printers one more time
We've seen this go sideways so many times that we can't fail you by forgetting to mention: that you should refresh your Windows printer definitions in RPM.
In the user interface, you can go to View -> Action Master List, then open the Action Master List tab. Next, click the "Type" column header and look for the "Text Printer" actions.
First, double-click the first Text Printer action. Next, click Browse beside the Printer Selection to open the standard Print dialog. Then click the Preferences button to select or review your desired printer preferences. Repeat these steps for each of the Text Printer actions. We highly recommend this because of the inevitable differences between systems such as the Windows or driver versions. Not doing so may result in intermittent problems which are challenging to track down.
If any of your Windows Printers have new names, you must double-click any Raw Printer actions and select the newly named printer from the Printer Selection list.
Conclusion
At this point, your new RPM should be in a workable state. However, if you had issues or encountered any errors along the way, we would encourage you to take a screenshot of the errors and send details to support [AT] brooksnet [DOT] com. It is also potentially a good idea to plan on calling if possible since there is likely to be some additional conversation required to establish the context that led to your problem.