Introduction
Queue Folders 2.0 is an entirely new product, compared to the previous release. When you upgrade to a version of RPM Remote Print Manager® ("RPM") which includes this release, there are a few considerations we need to inform you about.
Before you upgrade RPM
Important note prior to performing this RPM upgrade:
The version 1.0 Queue Folders monitors a single “parent folder”. If you configured this parent folder, the software would create a subfolder for each queue you configured, using the name of that queue.
Then files created in any or all of those folders were submitted to RPM as jobs in the queue it was named after.
We had plenty of conversations with users about this and decided to rebuild Queue Folders “from the ground up” as they say. The new philosophy and configuration are completely different, focusing on individual queues using any folder you want, within basic guidelines of course.
However, if version 1.0 behavior is important to you, we give you one chance to preserve that behavior. If this is what you want we will reproduce the version 1.0 setup in the new Queue Folders 2.0 which will give you this functionality.
After that, you are free to change the configuration on an individual queue basis to anything you like.
Do these steps
If you want RPM to preserve the version 1.0 setup, do this prior to running the upgrade:
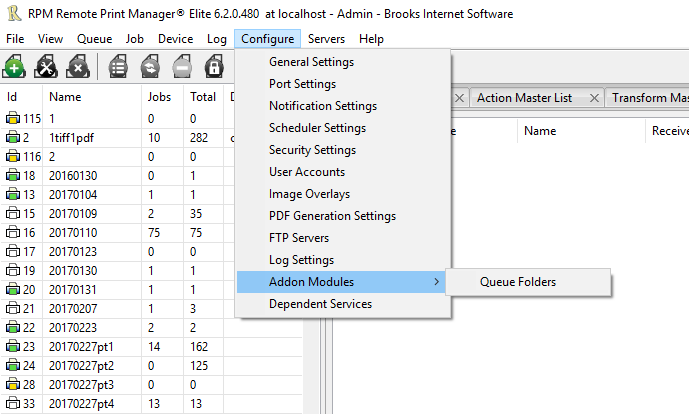
- In the RPM UI go to Configure / Addon Modules / Queue Folders:

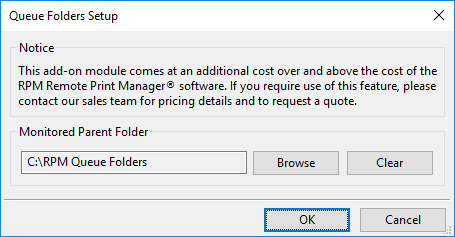
- In the Queue Folders Setup form, take note of the path for “Monitored Parent Folder”. If you want to keep this as your “parent folder” then click OK. Otherwise, change it to whatever you want.

When you run the upgrade, RPM will look for the old setting, create a folder if it doesn’t exist, and add the configuration to that queue to use that watch folder.
After that RPM removes the setting and continues with version 2.0 behavior only.
If you do NOT want RPM to preserve the version 1.0 behavior, then before you upgrade:
- In the RPM UI go to Configure / Addon Modules / Queue Folders
- In the Queue Folders Setup form, click the Clear button to erase the “Monitored Parent Folder”, then click OK