Introduction
RPM Remote Print Manager® (“RPM”) uses up to 3 protocols to receive print jobs and to communicate with the user interface. We occasionally run into a bit of confusion on this topic, and therefore, we offer this guide.
What is a protocol?
You can find any number of technical descriptions of network protocols. What we are trying to accomplish here is not to equip you with the right jargon but to help you figure out how to set up RPM in your environment, and how to work with your situation to get the most from RPM.
Let me explain protocols this way. I am a native English speaker but I’ve had a bit of language education in school as well as self-study before international travel. You can probably relate to that.
For instance, I once spent a week in Florence, Italy (and the food was terrific!). To get there, I had an address, name, and phone number of a mutual friend. Somewhere in London, I picked up a book about learning Italian in 24 hours. I had no mastery of the language! But, I learned enough to ask a question and understand the response.
When I exited the train, I asked a kind-looking Italian man, in very basic but polite Italian, if he could help me find the address. He gave me directions, in basic Italian, and I was able to get to where I needed to be.
A protocol works much the same way. One program asks, this is what I need, can you help me? If the second program understands the request, then it responds one way. If it doesn’t understand or can’t do it, it responds another way. You basically write your code around a conversation.
RPM can receive print jobs using the LPD protocol and the telnet protocol (also called raw socket in some circles). They are not the same, and you can’t get anything done trying to mix them. It just won’t work.
What is a port?
A TCP/IP port (sometimes called a network port) is a combination of a computer’s address and a number. The computer address is your IP address or hostname. The number is one usually associated with a certain protocol.
For instance, the Web protocol, HTTP, is typically on port 80. LPD is on port 515, Telnet is port 9100. You can find the specifications page for many printers online and see that they support LPD and port 9100. Sometimes a name is used with port 9100.
About the strict no-sharing policy
You wouldn’t expect to hop off the train in Florence and find someone who speaks Mandarin in the first second. Sure, many languages would be represented in a public place like that but you’d expect Italian more than anything else.
For similar reasons, it won't work to do LPD on the Telnet port because the other computer is almost certainly not going to expect it. It may try to do something with your LPD request but you likely won’t get a response you can use.
That’s just to name one example; in general, you can’t mix protocols. I don’t know of a situation where that would work.
What does RPM create on its own?
RPM is an LPD print server so by default it creates an LPD listener on port 515. The listener is just the part that listens for incoming connections and then hands them off to some code that does LPD.
RPM also uses a protocol we developed internally for talking with the user interface and a variety of custom programs we’ve developed. We call this “RPC” which stands for “remote procedure call”. There are actually other kinds of RPC protocols developed by some of the big computer companies. They are often used with a commercial brand of Linux or System V UNIX (or whatever they call it these days).
I don’t intend to do any marketing here with the term “UNIX”, just saying it exists and certain kinds of communications are common in the industry. If you hear the term “RPC” in general, we have ours, they have theirs, and there is no conflict intended.
Other companies, such as Microsoft, have similar technologies that go by a variety of other names.
Anyway, the point is that RPM always creates an RPC listener on port 9198. This is how the user interface knows how to connect to RPM for all the commands, status, job events, and basically everything the UI does.
Setup
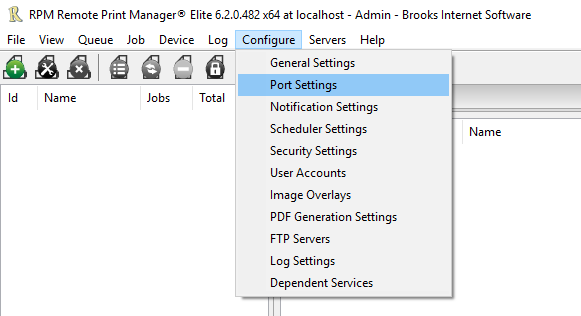
Let’s take a look at a default setup. Go to Configure / Port Settings:
If you have a new RPM configuration you should see something like the following:
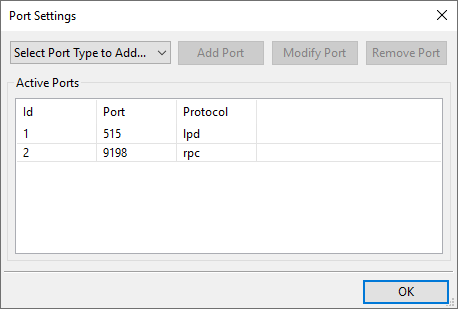
These are the two protocols I was describing above, LPD and RPC. Notice the default ports. It’s a good idea to leave these alone and to configure your remote programs, such as the print system on whatever computer you generate print from, to use the standard ports.
In particular, I think it’s important to note that you do not need to actually change anything in order to “get something to work”. RPM has been around a couple of decades and it’s designed to work pretty smoothly out of the box.
As soon as you think “maybe it will work if I change this” you are almost certainly going to be spending a lot of time doing something you don’t need to.
At this point, RPM is ready to accept print requests using LPD. That is, it’s listening for LPD requests. Nothing needs to be enabled.
I can also say with some assurance that RPC is working because the user interface is working.
In particular, we recommend that you do not modify the RPC settings until you have had a chance to review the RPM product manual. Look for “Port Settings” in the table of contents, then scroll down to “RPC”.
These settings are used to limit what a regular, non-administrative user can do with the user interface. It’s not necessary to use these settings to enable anything.
To get the manual, go to the Product Documentation page on our website and download the PDF.
Getting started with Telnet
Telnet is the third protocol that RPM uses on a regular basis. You have to add this as it is not normally configured by default.
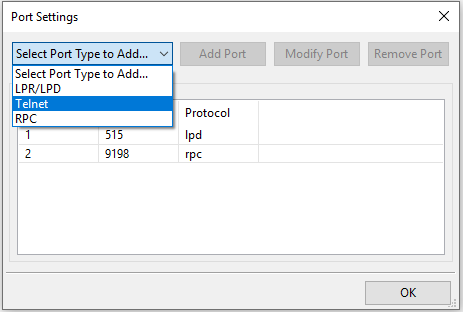
In the Port Settings form we saw above, click “Select Port Type to Add…”
Now click “Add Port”:
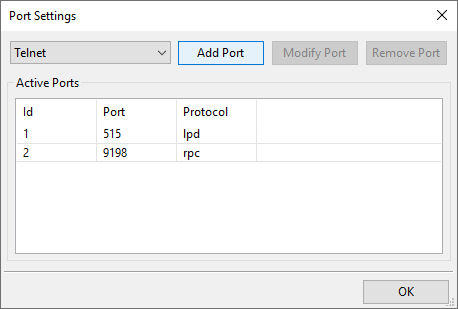
Now you have the Telnet setup form:
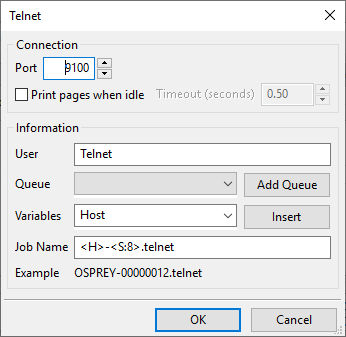
At a minimum, you will need to select a queue. If you have created queues already then click the droplist next to “Queue”.
If you have not added queues yet, or if you want to use a queue you haven’t already created, then click “Add Queue”.
You can change the other settings as you like.